Showing posts with label Spicy. Show all posts

Thursday, 30 January 2014

Italian Sausage Chili – Another Super Bowl

It’s been a while since we posted a chili recipe, and what better time than right before the Super Bowl? When it comes to feeding large groups of hungry sports fans frugally, there’s nothing like a big pot of chili. That’s right, more money for beer.

While I’ve added pork to ground beef in chili before, I’ve never tried it with all Italian sausage, and I loved the results. We Italian’d this up even more with cannellini beans and a touch of basil, but other than that, it’s a fairly classic chili (everywhere except Texas and Cincinnati).

Putting basil in chili may sound a little odd, but the sweet, aromatic herb is absolutely perfect with these big, bold flavors, which is why you’ll find it in things like spicy Thai curries and Vietnamese soups. It actually has me thinking about adding coconut milk to a beef chili, along with the basil, but that one is still in the brainstorming stage.

In the video, I mention not to drain the meat after you brown it. This is a common instruction in chili recipes, and is intended to drain off fat, but you also lose lots of flavorful juice. Instead, keep and reduce the juices as you finish browning the meat, and skim the fat off the top later. Everybody wins. I really hope you give this great chili a try soon…like Sunday. Enjoy!


Ingredients for 6 servings (you can double or triple for larger groups easily):
1 tablespoon olive oil
1 onion, chopped
2 1/2 pounds Italian sausage
1 teaspoon salt, or to taste
2 tbsp ancho chili powder
1 tsp paprika
1 tsp ground cumin
1/2 tsp ground chipotle pepper
1/2 tsp dried oregano
1 teaspoon ground black pepper
2 1/2 cups water
1 cup tomato puree
1 red pepper
1 green pepper
2 (12 ounce) cans cannellini or other white beans, drained and rinsed
*plus more water as needed during the two simmering stages
*garnish with sour cream, avocado, red onion, and basil!

Friday, 24 January 2014

Jerk Chicken Wings – Classic Jamaican Super Bowl Food

I’m not sure why I hadn’t thought of this before, but what more perfect marinade and glaze for a Super Bowl hot wing than a Jamaican jerk sauce? These jerk chicken wings were so flavorful, so different, and so additively delicious, that I may have eaten my last Buffalo wing. 

Okay, I didn’t mean that, but these really are amazing; a perfect balance of sweet, sour, salty, and spicy. I'm usually pretty casual about you changing my recipes, but I’m going to have to insist you not change any of the key ingredients, which are, every one of them. 

I guess this could work with other hot peppers, but the fiery, super-fruity Habanero (or Scotch Bonnet if you can find it) is critical for achieving true magic here. You’ll find them in any decent market, and they are very expensive per pound, but they’re very light, so three or four certainly won’t break the bank.

I mention in the video to marinate at least 8 hours in the fridge, which is the preferred method, but if you’re in a hurry, like I was, you could just leave it out on the counter at room temperature for two hours instead. Keep it covered, and give it a stir every 15 minutes or so, but that will get you pretty close to the colder, slower refrigerator method.

So, if you’re looking for a little change of pace this year, why not take a break from those same old wings (sorry again, Buffalo), and give these tasty jerk wings a try instead? Enjoy!


Ingredients for about 24 Jerk Chicken Wing Drumettes:
3 lbs chicken wings
1/2 yellow onion, chopped
6 garlic peeled cloves
1/2 cup green onions, sliced
3 Habanero chili peppers, seeded, chopped
2 tablespoons freshly picked thyme leaves
1 tablespoon kosher salt
2 teaspoons black pepper
2 teaspoons ground allspice
1 tsp dried thyme
1/2 teaspoon cinnamon
1/2 teaspoon cumin
1/2 teaspoon freshly grated nutmeg
2 tablespoons vegetable oil
3 tablespoons soy sauce
2 tablespoon packed brown sugar
1/3 cup fresh lime juice, about 3 juicy limes

Blend all ingredients and marinate 8 to 12 hours in the fridge; or 2 hours at room temp.
- Bake 20 min at 450 F.
- Paint and turn, bake 15 minutes more
- Turn and paint, and bake 10-15 minutes more, or until well-browned and tender.

Sunday, 19 January 2014

Shrimp Etouffee – Desperate Times Call for Delicious Measures

I won’t go into the sordid details of how I came into possession of substandard shrimp, but it did afford me the opportunity to demo a few tips in this shrimp etouffee video, just in case you ever find yourself in the same boat. 

I have absolutely no problem with frozen shrimp, which is a good thing, since that’s the only kind you can buy; but when making recipes like this, I prefer a larger size, and definitely with shells on.

Making a rich shrimp stock from the sautéed shells is one of the secrets to a great etouffee, but besides loss of flavor, I find smaller, already-peeled shrimp retain much more water, which leaks out when cooked; thinning and weakening every sauce in their wake.

A little sear can release a lot of this excess liquid, which can then be reduced in the sauce. This also makes the final moments of the dish pretty easy, as these small shrimp only take a few minutes to cook through. 

Of course, if you do buy some nice 16-20’s (jumbo-sized), go ahead and make the stock (see technique here), and give the shrimp a nice pan-sear first before finishing the recipe as shown. With Mardi Gras coming up soon, you have the perfect excuse to give this delicious recipe a try soon. Enjoy!


Makes 4 large portions:

Spice Blend (everything is “to taste”):
1/4 tsp dried thyme
1/4 tsp dried oregano
1/4 tsp cayenne
1/4 tsp garlic powder
1/4 tsp onion powder
1/4 tsp white pepper
1/4 tsp black pepper
3/4 tsp paprika

Then:
1 tbsp vegetable oil
2 pounds peeled and deveined raw shrimp, seasoned with 1/2 tsp salt and 1 tsp of the spice blend
3 tbsp butter
1/3 cup diced onions
1/3 cup celery, sliced thin
1/3 cup diced green pepper, sweet or hot
remaining spice blend
2 generous tbsp flour
1/2 cup diced tomatoes
2 cups chicken stock (including shrimp juices added in)
1/2 tsp Worcestershire sauce
hot sauce to taste
salt to taste
1/4 cup sliced green onions
4 portions cooked white rice

Thursday, 16 January 2014

Kentucky Beer Cheese – Love at Third Bite

Very few love Kentucky Beer Cheese at first bite. As you crunch your first taste, the palette quickly identifies a sharp cheddar cheese spread, but then stale beer fills the nose, and you instantly think, “I should have gone clam dip.”

But after three or four bites, you stop thinking about your college dorm room carpet, and your palette adjusts to the unusual flavor profile, and this humble cheese spread becomes as addicting as any I’ve ever had. In a way, it’s sort of analogous to drinking your first beer, but that’s a whole other post.

The texture is much smoother and creamier than it looks, and that little hint of raw alcohol provides a fermented funkiness in the background that is the key to the recipe. Well done, Bluegrass State. Well done. By the way, you can upgrade the beer if you wish, but then you will not be eating real Kentucky Beer Cheese.

People around those parts may argue about the amount of pepper, or if you should throw in a chunk of cream cheese or not, but everyone agrees that this spread requires a cheap, domestic beer. Preferably from a can.

So, if you’re looking for something a little different for your Super Bowl party, I hope you give this Kentucky Beer Cheese recipe a try. If it’s a big hit, you can bring it back for your Kentucky Derby party. I’m sure it’s fabulous with mint juleps. Enjoy!


Ingredients for  about 3 cups Kentucky Beer Cheese:
16 ounces of cheese
2 cloves garlic, minced fine
1 teaspoon dry mustard
1/2 tsp freshly ground black pepper
1/2 tsp cayenne powder
1/4 tsp salt
1/4 tsp Tabasco sauce
1/4 tsp Worcestershire sauce
1 cup flat beer

Tuesday, 14 January 2014

Chicken & Mushroom Chimichanga – A Thingamajig of Beauty

As legend has it, many years ago in Tucson, AZ, a woman accidentally dropped a burrito into a deep fryer. She started to blurt out a common Spanish swear word, but remembering her kids were in the kitchen, yelled out “chimichanga!” instead. She let it fry golden and crisp, and the rest is culinary history.

If you’re wondering, Chimichanga translates to “thingamajig,” which is fitting, since that’s kind of what this is. A thingamajig stuffed with whatever. In this case, whatever was a very tasty mixture of chicken, mushrooms, poblano chilies, and pepper Jack cheese.

While that particular combination is highly recommended, this is more of a technique video, so when it comes to the filling, I encourage wild experimentation. We used raw chicken here, but Chimichangas are also great for using up leftover, cooked meats. Just cube it up, toss it in when the vegetables are done, and proceed as shown.

And don't feel like you have to stay in the Tex-Mex zone. This versatile, folded and fried tortilla could make a fantastic delivery system for all kinds of ethnic foods. Anyway, no matter what kind of filling is used, or how it’s seasoned, I think everyone will agree that it’s never a good idea to curse in front of children. I hope you give this delicious son-of-a-gun a try soon. Enjoy!


Ingredients for 4 portions:
(exact measurements are not critical, as you can stuff these with anything that fits)

For the filling:
1 tbsp vegetable oil, divided (half for veggies, half to cook chicken)
1/2 cup diced onions
1/2 cup diced poblano peppers
1/2 cup sliced mushrooms
12 oz boneless skinless chicken breast meat, cut in 1/2-inch cubes
salt, freshly ground black pepper, cayenne pepper to taste
1/4 tsp cumin
1/4 tsp chipotle, smoked paprika, or other hot or mild ground chili pepper
pinch dried Mexican oregano
1 or 2 tbsp cold water to deglaze pan once chicken is browned
4 ounces grated pepper Jack cheese

Also:
4 large flour tortilla (at least 10-inch wide)
1 egg white
2 tbsp vegetable oil for pan-frying
sour cream, guacamole, and salsa to garnish, optional

Sunday, 29 December 2013

Utica Greens and Beans – Finding Good Fortune in Upstate New York

As many of you hardcore foodies know, there’s a southern tradition of eating beans and greens on New Year’s Day to help bring good fortune in the coming year. 

By eating “poor” the first day of the year, you supposedly ensure prosperity and good luck the rest of the year. I think I speak for all superstitious, Italian-Americas when I say, that totally makes sense.

Whether you believe in such things or not, you should still try this year’s edible good luck charm, Utica Greens. This delicious Upstate New York vegetable casserole comes in many forms, but usually contains some combination of bitter greens, usually escarole, pancetta or prosciutto, hot fresh or pickled peppers, and bread crumbs.

I’m adding some cranberry beans, so you all get rich in 2014, but that’s totally fine since the locals often add chunks of potatoes, and once you start doing things like that, all bets are off. Whether side dish or main course, this is a perfect winter vegetable magnet, and I hope you give it a try soon. Enjoy, Happy New Year, and most of all, good fortune!


Ingredients for 6 side dish servings:
2 heads escarole
2 tbsp olive oil
4 ounces pancetta or prosciutto, diced (You can drain some of the rendered fat if it looks like it's going to be too much. You want about 2 tablespoons total rendered fat pancetta in the casserole)
handful of sliced fresh hot peppers, or jarred pickled peppers
3 cloves minced garlic
1 cup chicken broth
12 ounce can cooked cranberry beans, or Cannellini beans, butter beans, white beans, etc., optional
salt and black pepper to taste
red pepper flakes
1/2 cup fine plain bread crumbs, plus more for the top
1/2 cup finely grated parmesan cheese
drizzle top with more olive oil

Sunday, 22 December 2013

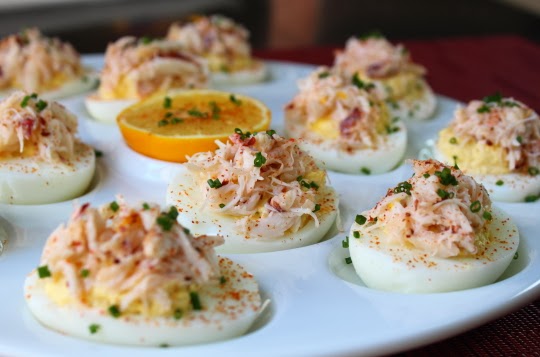
Crab-Stuffed Deviled Eggs – I Love to Say I Told You So

I love deviled eggs, and have probably had fifty different versions over the years, but these crab-stuffed beauties may be my favorite. The sweet crab is a perfect compliment to the spicy eggs, but above and beyond the delicious flavors, these just look extra special. Okay, that’s enough about the recipe…now, on to more important matters.

Considering the fact that we’ve done almost 1,000 uploads, we’ve had very few controversial recipes. And by “controversial, I mean videos that caused vigorous debate about whether the recipe actually works as shown. One such video was our “How to Make Perfect Hard Boiled Eggs.”

While most had no issues, a small but vocal group claimed the recipe didn’t work at all. Some went so far as to say the video was a hoax, as if the egg industry had gotten to me, and convinced me to trick my viewers into wasting eggs to increase sales. I’ll admit, it is a brilliant plan, but it’s not true.

To prove my innocence, I’ve used the exact same method here, and once again, perfection. As long as you’re using a decent pot (as in not paper-thin), enough water, and can manage to successfully set a timer, I’m not sure what can go wrong. By the way, I used cold eggs, so that’s not an issue, as some surmised after the first tutorial. To summarize: I told you this works.

Regardless of how you cook your hard-boiled eggs, this would make a stellar hors d'oeuvre for any special occasion meal. You can be as frugal or extravagant as you want, and the garnishing options are pretty much limitless. Speaking of garnishes, that is a lemon, and not an orange! It's actually a Meyer lemon which have a much warmer color than standard lemons. I hope you give these a try soon. Enjoy!


Ingredients:

For the bottoms:
*6 large hard-boiled eggs (makes 12 pieces)
2 oz fresh crab meat, chopped
3 or 4 tbsp mayonnaise, or enough to achieve desired consistency
few drops of Worcestershire sauce
1 tsp Dijon mustard
1 tsp lemon juice
2 tsp chopped tarragon
1/2 tsp hot sauce or to taste
pinch of old bay
salt and pepper to taste (don't be shy with the salt)

For the crab topping:
2 oz fresh crab meat, shredded slightly
1 or 2 tsp crème fraiche or sour cream
lemon zest of one lemon
Aleppo pepper to taste
salt if needed
Fresh chives
Cayenne

* I only made 12 portions, but this method will work with more. Just be sure your eggs are cover by at least an inch or two of cold water, and proceed as show.

Tuesday, 10 December 2013

Roasted Beef Tri Tip with Four-Peppercorn Crust – A Holiday Roast with an Angle

Tri tip of beef is a common summer grill option, but I don’t think I’d ever seen it done as a holiday roast. I tried to think of a reason why it wouldn’t work, but I couldn’t come up with anything. In fact, I decided that not only would this make a great, and more affordable alternative to prime rib, but it would also remind guests of mid-July, which is a proven treatment for winter blues. Side effects may include seconds and thirds.

This is not as tender as a prime rib, but if cooked to the right doneness, you’ll be enjoying juicy, flavorful, and plenty tender enough meat. To that end, I’d avoid the temptation to cook this rare, which can make it too chewy. I like to pull it at 130 F. internal temp, which after resting will give you something closer to medium. For me, this provides the best texture, and an even beefier flavor.

Having said that, there should be something for everyone. Plenty of nice pink meat to go around, and the narrower end will provide just enough well-done for your Aunt. You know, the one who's afraid to get a brain parasite after watching that show on Discovery Channel.

As I mentioned in the video, any veal, beef, or chicken stock/broth will work for the sauce, but I used a super sticky oxtail broth that I will show at future date. If you can’t wait, simply do our beef stock recipe with oxtails. Anyway, if you’re looking to do a beef roast for the holiday table, I hope you give this peppery tri tip a try. Enjoy!


Ingredients for about 6 portions:
2 1/2 to 3 pound beef tri tip roast, trimmed
3-4 garlic cloves crushed with a pinch of salt and a tablespoon of olive oil
salt to taste
enough very coarsely ground black, white, green, and pink peppercorns to cover the surface,
about 4-5 tbsp
Start at 450 F. for 15 minutes, removed and turn roast, reduce heat to 200 F. and roast to an internal temperature of 125-130 F. Let rest 15 minutes!

For the pan sauce;
Reserved pan drippings, about 2 tbsp
1 rounded tablespoon flour
3 cups rich *veal, beef, or chicken broth or stock (or oxtail…coming soon!)
1 tbsp balsamic vinegar
salt and cayenne to taste
*Most fancy grocery stores will sell frozen veal stock or demi-glace (already reduced-by-half veal stock), which is great for special occasion sauces like this.

Monday, 30 September 2013

Beef Medallions with Fresh Horseradish Cream – Perfect for the Middle of Fallmer

This time of year can be a little schizophrenic for a cook. We’ve not quite let go of summer and its fast, fresh food; but at the same time, the cooler weather has us craving hearty, more comforting fall fare. This beef medallions with fresh horseradish cream recipe is delicious nod to that kind of seasonal culinary dilemma.

The combination of the sweet, juicy tomato salad base, along with the seared beef, and aromatic sauce works whether you’re enjoying it on a warm autumn day, or cold, rainy night. My only regret is I didn’t have any crusty bread around to soak up all those incredible juices. That's a rookie mistake any time of year!

Like I said in the video, horseradish is easy to find these days, especially in the higher-end grocery chains. It’s usually sold by the pound, so don’t be afraid to ask the produce person to cut you off a smaller piece, as the roots can get pretty big. If you’ve never used fresh horseradish before, I hope you check it out soon. Enjoy!


Ingredients for 2 portions:
2 tbsp vegetable oil for frying
4 pieces (about 3-oz each) beef top sirloin, pounded into 1/4-inch thick medallions
salt, pepper, and cayenne to taste
flour as needed
2 cups cherry tomatoes, quartered
1 tbsp rice vinegar
1/2 tsp salt
1/4 tsp sugar
freshly ground black pepper to taste
For the horseradish cream:
2 tbsp freshly, finely grated horseradish root
pinch of salt

Friday, 30 August 2013

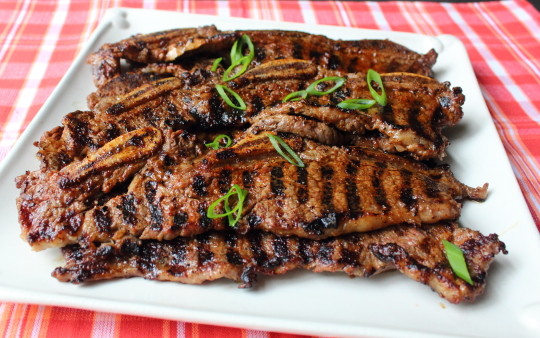
Grilled Kiwi & Chili-Rubbed Beef Short Ribs – Labor Day Cooking Shouldn’t Be a Lot of Work

Labor Day weekend is always a bittersweet holiday. It’s supposed to honor America’s organized labor movement, but really what it mostly celebrates is the end of summer. 

Pretty soon our grills will be covered by huge snow drifts, and the season’s warm breezes will be a distant memory. Well, not for me, as I live in California, but you get the point.

This grilled kiwi and chili-rubbed beef short ribs recipe is specifically designed with that melancholy in mind. The prep is minimal, and the ultra short cooking time means that instead of being stuck in front of a grill, you can actually enjoy more of these last precious summer days.

We tied the world record here for fewest ingredients in a marinade, with one, but thanks to the kiwi’s enzymatic magic, that’s all we need. Unlike some tropical fruit marinades, kiwi doesn’t turn the meat into mush, and provides a nice, slightly sweet and acidic base for our Ancho chili rub. I loved how this came out, and while highly-seasoned, the beefy goodness of the short ribs really came through.

I want to wish all of you a happy and healthy Labor Day weekend. What better way to celebrate organized labor, than by doing the minimum amount of it at your cookout? I hope you give these super simple, but very delicious kiwi and chili-rubbed short ribs a try soon. Enjoy!


Ingredients for 4 portions:
2 pounds Korean-style (aka flanken style) beef short ribs
1 kiwi
For the chili rub:
1 tbsp ancho chili powder
1 tbsp sugar
1 tbsp kosher salt
2 tsp freshly ground black pepper
1 tsp garlic powder
1/4 tsp cayenne, or to taste

Tuesday, 20 August 2013

Beef Satay – You Should Warn Your Tongue

Beef satay was the very first Thai food I ever tasted, and it was literally love at first bite. Ah, that sweet, spicy, salty, smoky, and slightly funky bite…I remember it like it was yesterday. 

It helps that I ate this yesterday, but still. If you’ve never had satay before, its lightning bolt of flavor can be a bit of a shock to the system. A recipe for the subtle palate, this is not. By the way, I do know that satay was actually invented in Indonesia, but for the purposes of this blog post, we're going with that it's Thai.

This will work on just about any meat, but beef is my favorite. There’s something about beef and these particular spices that just sings. Also, the magic that Asian fish sauce always adds is never more apparent than with beef, especially if that beef destined for the charcoal grill. The same goes for the lemongrass.

If you look around the produce aisle at your town’s best (meaning most expensive) grocery store, you should find some lemongrass stalks. They also sell tubes of pure lemongrass paste online, in case that’s a better option. Some say you can get away with some lime and/or lemon zest and juice, but at least attempt to find some for your old friend, Chef John.

With grilling season still in full swing, you can never have enough new and exciting ways to enjoy beef, and this is certainly at least one of those things. And of course, stay tuned for the peanut dipping sauce recipe next. I hope you give it a try soon. Enjoy!


2 lbs beef top sirloin steak, sliced thin across grain, about 1/8-inch thick
Satay Marinade:
1 tbsp grated ginger
4 cloves garlic, crushed
2 tbsp minced onion
1/4 cup packed brown sugar
1/4 cup fish sauce
2 tbsp soy sauce
2 tbsp vegetable oil
2 tbsp ground coriander
1 tbsp cumin
1/2 tsp turmeric
1/8 tsp cayenne pepper

Wednesday, 17 July 2013

Spicy Peach Coleslaw – An Apple Is an Excellent Thing – Until You’ve Tried a Peach

You may remember this peach coleslaw from such video recipes as, Grilled Coffee and Cola Skirt Steak. It was a beautiful match, and as I ate, I couldn’t help but wonder why you don’t see peaches used in these cold cabbage salads more often.

People have no problem loading up their ‘slaws with grated apple and diced pineapple, so it can’t be an anti-fruit bias. I think the real reason is that a perfectly ripe peach is such an incredible experience, that it seems almost criminal to consume it any other way.

I think George du Maurier put it best when he said, “An apple is an excellent thing – until you have tried a peach.” So, is that it? Just too good to not eat as is? That could explain some of it, but just in case the real reason is that you simply hadn’t thought of it before, I’m posting this. I hope you give it a try soon. Enjoy!


Ingredients for 6-8 portions:
1 pound thinly sliced cabbage
2 diced peaches
1 tbsp thinly sliced chives
for the dressing (everything is “to taste”):
2 generous tablespoons mayo
1 rounded teaspoon Dijon mustard
1 tablespoon sambal chili sauce
1/2 lemon, juiced
2 tablespoons rice vinegar
1 tablespoon vegetable oil
1/2 teaspoon sugar
salt and cayenne to taste

View the complete recipe

Monday, 3 June 2013

Sweet Hot Mustard Chicken Thighs – Good to the Bone

I don’t make a lot of Indian food on this blog, but I do borrow a lot of techniques inspired by that cuisine. Things like toasting spices in fat for stews, marinating meat in yogurt, and slashing chicken down to the bone, as I did with these sweet, hot mustard thighs.

I know it’s a bit controversial, since some say you lose moisture, but any technique that's been practiced for a thousands years is okay by me. I think it helps permeate the chicken with the sweet, hot mustard marinade, as well as gives the final product some fairly cool “racing stripes.”

As I mention, if you insist on using boneless-skinless thighs, this will still work, but it is really is a recipe where the bone is key. You may have heard the expression, “the closer the bone, the sweeter the meat,” and it’s so true. There are many ingredients you can substitute for, but bones aren’t really one of them.

Imagine a chef boning out a rack of ribs before barbecuing them, so that they’re easier to eat? …actually, don’t imagine that, but I think you get the point. Anyway, I hope you try this very easy and delicious sweet, hot mustard chicken thigh recipe soon. Enjoy!


Ingredients:
(consider all the spices “to taste” and adjust to your liking)
8-10 chicken thighs
1/2 cup Dijon mustard
1/4 cup packed brown sugar
1/4 cup red wine vinegar
1 tsp mustard powder
1 tsp freshly ground black pepper
1 tsp salt
1/2 tsp ground dry chipotle
cayenne to taste
1 onion sliced into rings
4 cloves minced garlic
vegetable oil for the pan and top of chicken

View the complete recipe

Tuesday, 14 May 2013

Barbecue Shrimp – So Good, and So Not Barbecued

No one’s really sure why this magnificent dish is called barbecue shrimp, but since it was invented in New Orleans, let’s just assume they had a great reason, and move on to more important issues, like making and eating a huge plate of these.

There are countless ways to make this dish, almost all containing copious amounts of butter, along with garlic, black pepper, and Worcestershire sauce. This is not something you’d serve to your friend with the bland palate. By the way, can’t believe you’re still friends with that bland palate dude.

Anyway, feel free to adjust and adapt to your heart’s content. My version is fairly light, which is kind of funny to say, since I call for half a stick of butter, but I’ve seen versions that were basically deep-fried in the stuff. So, you know, compared to that, this is like spa food.

As far as seasoning goes, be careful with the salt. The Worcestershire is pretty salty, so you may not want to add it all to the shrimp stock like I did. I used about 3 generous tablespoons, since I like mine pretty salty, but it’s probably safer to just add 1 or 2 tablespoons, and then taste/adjust later on.

Other than that, and finding some colossal shrimp (the bigger the better), this recipe is a breeze. It may not have anything to do with barbecue, but like its namesake, it’s incredibly delicious and another great culinary gift from the south. I hope you try some soon. Enjoy!


Ingredients for 4 servings:
1 1/2 to 2 pounds colossal shrimp
1 1/2 tbsp vegetable oil
1 tablespoon freshly ground black pepper, or to taste
1/4 tsp smoked paprika
1/8 tsp cayenne pepper
1/8 tsp Old Bay seasoning, optional
4 tbsp cold butter, cut in cubes
6 cloves garlic, minced
1 tbsp minced fresh rosemary
1 1/2 cups shrimp stock (using reserved shells, sauteed in 1 tsp butter, and simmered with 2 cups stock or water for 20-30 min)
juice of 1 lemon
hot sauce to taste 
2-3 tbsp Worcestershire sauce, or to taste
lots of white rice

View the complete recipe

Thursday, 2 May 2013

Shrimp & Jalapeno Nachos for Cinco de Mayo or Cinco de Anytime

These simple and addictive shrimp and jalapeno nachos are not only a nice alternative to more common versions, but a great reminder of how this iconic snack was actually intended to be served. Contrary to current fashion, nachos didn’t start out as a giant pile of chips drenched in ladles of florescent gold cheese sauce.

The earliest versions were made by simply broiling a single layer of cheese-topped chips, which were then garnished with jalapeno peppers – simple and elegant, with every chip genetically identical to the next. Over time we’ve added hundreds of toppings, as well as replaced the broiled (real) cheese with something that you can also use to grease an axel.

Don’t get me wrong, I enjoy the aforementioned version just as much as the next guy wearing pajama jeans, but once in a while it’s good to revisit a simpler time in American snacking. If you’re planning to party, I wish you a fun and safe Cinco de Mayo, and hope you give these very tasty chips a try. Enjoy!


Ingredients for 4 Portions:
1 pound peeled and deveined shrimp (I used 50-60 per pounds size, which are ideal for this)
1 tbsp vegetable or olive oil
pinch of cayenne
1/4 tsp ground chipotle pepper
salt and pepper to taste
50-60 large tortilla chips, or as needed
2 jalapeno peppers, sliced very thin
about 3 1/2 cups of shredded Monterey Jack or cheddar cheese
avocado creama (1 avocado, 1 cup sour cream, and juice of 1 lemon or 2 limes; liquefied in a blender)
sliced cherry tomatoes and freshly chopped cilantro to garnish

View the complete recipe

Thursday, 18 April 2013

Celebrating National Garlic Day with Sopa de Ajo - Spanish Bread and Garlic Soup

As a very, very small percentage of you may know, tomorrow is National Garlic Day, and what better way to celebrate than with a big bowl of Spanish garlic soup? Sopa de Ajo is a wonderfully rustic bread soup, spiked with sliced garlic, paprika, and ham.

If that wasn’t enough to get your attention, it’s also topped with eggs poached in the fragrant, brick red broth. It’s like a steaming bowl of breakfast-for-dinner. 

Like I say in the clip, there are as many ways to make this as families in Spain, but I really think toasting the bread is key. You’re basically replacing the flavorless water in the bread with olive oil and awesome soup.

Plus, having the olive oil baked into the cubes makes for a better texture in my opinion. Whether you make this tomorrow to celebrate a totally made-up holiday, or wait until you have some stale bread sitting around, I really hope you try this incredibly comforting Spanish soup. Enjoy!


Ingredients for 4 portions:
About 6 cups of cubed French or Italian bread
1/4 cup extra virgin olive oil, plus more to drizzle on bread cubes
6-10 thinly sliced garlic cloves
2 oz ham diced
1-2 tsp paprika or to taste
6 cups chicken broth
4 large eggs
1/4 cup chopped Italian parsley
salt, pepper, cayenne to taste